Plan Management
Subscription plans define what a tenant can do on your LMS platform. Each plan sets a price, billing cycle, and resource limits (users, courses, storage).
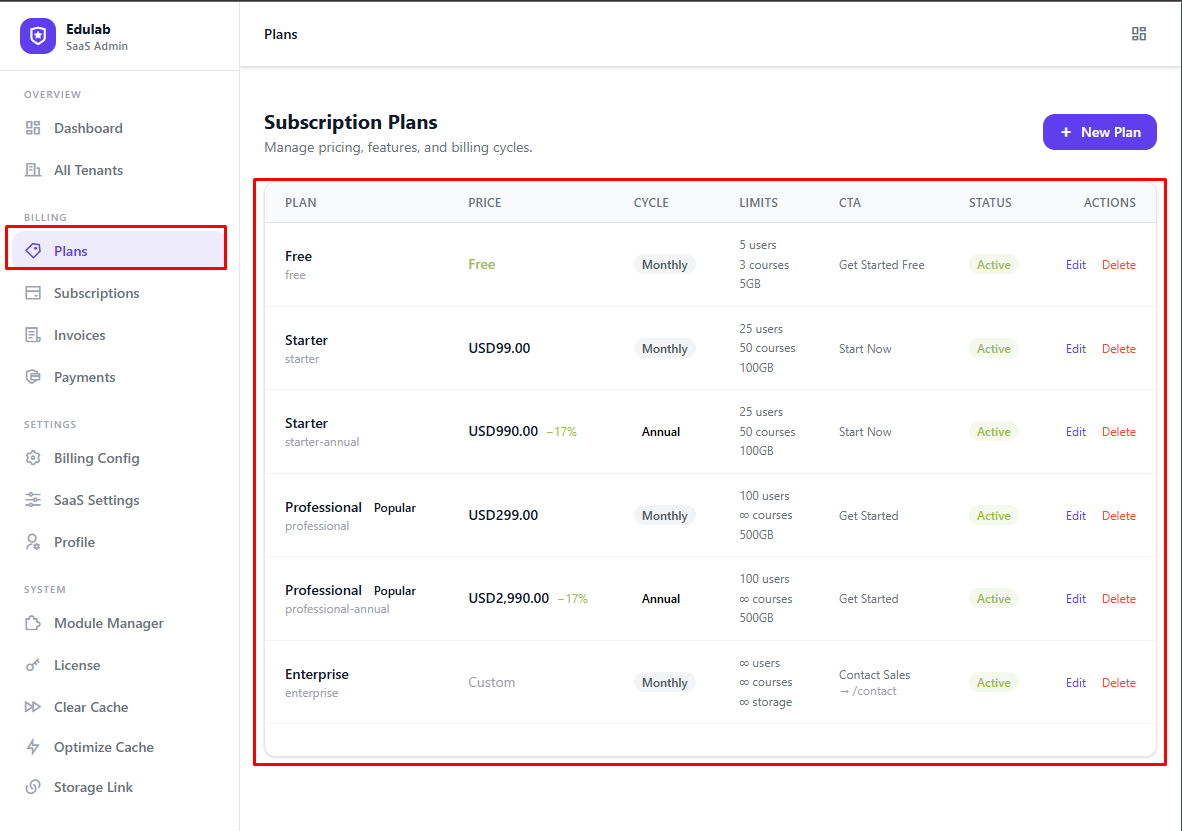
Viewing Plans
Navigate to Admin → Billing → Plans.
You will see a table listing all plans with their name, price, billing cycle, status, and action buttons.
Creating a Plan
Click Create Plan to open the plan form.
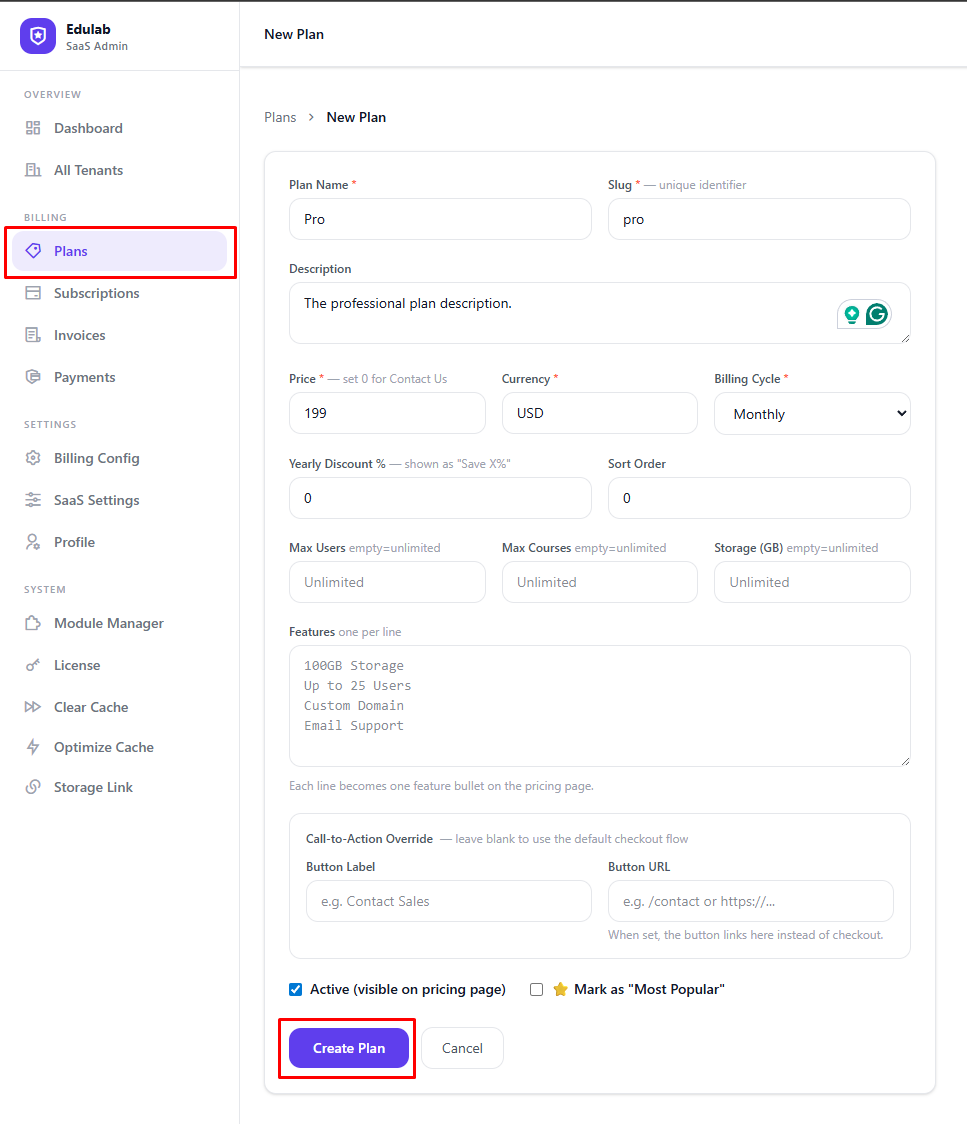
Basic Settings
| Field | Required | Description |
|---|---|---|
| Name | ✓ | Display name shown on the pricing page (e.g. "Starter") |
| Slug | ✓ | URL-friendly ID (e.g. starter). Auto-generated from name. Used in /tenant/register?plan=starter |
| Description | — | Short tagline shown under the plan name on the pricing page |
| Price | ✓ | Numeric price. Set to 0 for a free plan |
| Currency | ✓ | Currency code (e.g. USD). Should match your billing default |
| Billing Cycle | ✓ | monthly or annual |
| Sort Order | — | Controls display order on the pricing page (lower = first) |
Resource Limits
Leave any limit field blank (or 0) to allow unlimited usage.
| Field | Description |
|---|---|
| Max Users | Maximum number of students + instructors in the tenant LMS |
| Max Courses | Maximum courses the tenant can create |
| Max Storage (GB) | Maximum file storage in gigabytes |
Display Options
| Field | Description |
|---|---|
| Is Active | Only active plans appear on the pricing page and registration form |
| Is Featured | Marks the plan with a "Most Popular" badge |
| Yearly Discount % | Shown as a savings badge when billing cycle is annual (e.g. 20 = "Save 20%") |
| CTA Label | Custom button text (default: "Get Started") |
| CTA URL | If set, the button links here instead of the registration form — useful for Enterprise "Contact Sales" plans. Supports /contact or full https://... |
Features List
Enter one feature per line. These appear as bullet points on the pricing card.
Custom domain support
Priority support
API access
White-label branding
Click Save to create the plan.
Editing a Plan
Click the Edit icon on any plan row to modify it.
Note: Changing the price or billing cycle of an existing plan does not affect active subscriptions — only new sign-ups will use the updated price.
Enterprise / Custom-Priced Plan Pattern
Use this pattern when pricing is negotiated by sales:
- Set Price = 0
- Set CTA Label = Contact Sales (or your wording)
- Set CTA URL = /contact (or full external URL)
- Keep plan active so it appears on pricing/registration screens
What happens:
- The plan is shown as custom/contact-sales in the UI.
- Self-service checkout is not used for this plan.
- Your sales/support team can later assign final pricing and billing manually.
Recommended workflow:
- Create lead via contact form/CRM.
- Agree scope and final recurring amount.
- Update tenant billing from admin after commercial approval.
Activating / Deactivating a Plan
Toggle the Is Active switch. Inactive plans are hidden from the pricing page and registration form but remain linked to any existing subscriptions.
Deleting a Plan
Click the Delete icon. A confirmation popup will appear.
Warning: You cannot delete a plan that has active subscriptions. Deactivate it first, then reassign or cancel those subscriptions before deleting.
Plan Ordering on the Pricing Page
Plans are displayed in ascending sort_order order, with ties broken by price. To reorder:
- Edit each plan
- Update the Sort Order field (1 = leftmost / first)
- Save
Free vs. Paid Plans
| Behaviour | Free Plan | Paid Plan |
|---|---|---|
| Payment required at registration | ✗ | ✓ (or trial) |
| Trial period | ✗ | ✓ if trial enabled |
| Auto-renewal | ✗ | ✓ |
| Billing records created | ✓ (status: active) | ✓ |
| Invoices generated | ✗ | ✓ |
Linking to a Specific Plan
You can deep-link customers directly to a plan on the registration form using the ?plan= query parameter:
https://yourdomain.com/tenant/register?plan=starter
https://yourdomain.com/pricing/starter
The registration form will pre-select the specified plan.